Using Repository Editor
Using Repository Editor
This chapter describes tasks that can be performed in repository editor. For general information on repository editor, see Introducing Repository Editor.
The following topics are included in this chapter:
- Browsing Design Repository
- Filtering and Grouping the Project Tree
- Creating Projects in Design Repository
- Opening a Project
- Closing a Project
- Saving a Project
- Viewing Project Properties
- Modifying Project Contents
- Copying a Project
- Removing a Project
- Deploying a Project
- Comparing Project Revisions
- Exporting a Project or a File
- Unlocking a Project
- Browsing the Deployment Repository
- Committing with Missing User Data
Browsing Design Repository
Repository editor displays all projects in user’s workspace and Design repository. The project tree is organized into the following categories:
| Category | Description |
|---|---|
| Projects | Contains OpenL Tablets rule projects. |
Projects from all repositories are displayed in a common list that is sorted alphabetically.
The status of each project in the tree is identified by a specific icon. The following table describes the icons in the project tree:
| Icon | Description |
|---|---|
| Project is closed. It is available only in Design repository and must be opened to copy it to user’s workspace. | |
| Project is opened for viewing. It is copied to user’s workspace and can be modified. If the product is restored from the previous revision, its status is set to Viewing Revision, otherwise its status is set to No Changes. |
|
| Project is edited by the current user. It is copied to user’s workspace and is modified. Other users cannot edit the project. To save changes, the project must be saved. |
|
| Project is closed by the current user but edited by another user (Closed – Locked). Current user cannot edit the project. | |
| Project is opened for viewing by the current user but edited by another user (Viewing Revision - Locked). Current user cannot edit the project but can browse the project in Rules Editor. |
|
| Project exists only in user’s workspace but not in Design repository (Local). Other users do not see this project. User can delete the project or import it into Design repository as described in the Creating Projects in Design Repository. |
|
| Project is marked for deletion. In OpenL Studio, deletion of a project takes place in the following phases: - Deleting a project: Project is removed from user’s workspace and marked for deletion. In this phase, the project can be restored using the undelete function. For information on deleting a project, see Deleting a Project. - Erasing a project: Deleted project is permanently removed from Design repository. After this phase, the project cannot be restored. For information on erasing a project, see Erasing a Project. |
Filtering and Grouping the Project Tree
Projects in the repository editor are filtered the same way as in Rules Editor.
To filter projects by name, enter the name in the filter text box. All projects matching the name are displayed in the Projects list.
To group projects by repository or tag types, click the Group Projects icon ![]() and select the required values. Please note that values of tags for grouping are taken from the most recent version of a project. If user has changed project tags in an opened project, a project is required to be saved in order for a change to be reflected in a tree. For more information on tag definition for a project, see Managing Tags.
and select the required values. Please note that values of tags for grouping are taken from the most recent version of a project. If user has changed project tags in an opened project, a project is required to be saved in order for a change to be reflected in a tree. For more information on tag definition for a project, see Managing Tags.
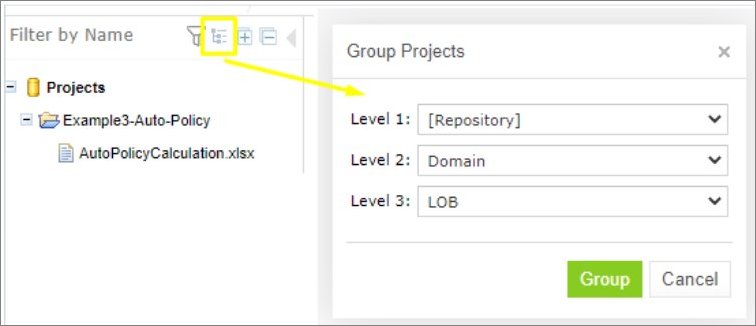
Grouping projects by tags
To expand or collapse the repository tree, use the expand and collapse icons ![]() .
.
To view archived deleted projects, click the advanced filter icon ![]() and clear that the Hide deleted projects option.
and clear that the Hide deleted projects option.
Creating Projects in Design Repository
OpenL Studio allows users to create new rule projects in the Design repository in one of the following ways:
| Way | Section |
|---|---|
| Create a rule project from a template | Creating a Project from Template |
| Create a rule project from Excel files | Creating a Project from Excel Files |
| Create a rule project from an OpenAPI file | Creating a Project from OpenAPI file |
| Create a rule project from a zip archive | Creating a Project from ZIP Archive |
| Import a rule project from workspace | Importing a Project from Workspace |
| Create a rule project from repository | Creating a Project from a Repository |
Whatever the way used, new projects are created in the No Changes status that means they are open and can be modified.
Projects with the same name can be created in different repositories. These projects cannot be in the same status. If the first project is in the No Changes status, the second one is assigned the Closed status. After closing the first project, the second can be opened.
Creating a Project from Template
This section describes how to create a project using a template and includes the following topics:
Creating a Project Using a Default Repository Template
This is the easiest way to create a rule project in the Design repository that must be preferably used for demonstration or introductory purposes.
While creating a project from template, use the following template types:
| Template type | Description |
|---|---|
| Simple Templates | Include the following: - Sample Project is a very simple project consisting of one rule table and hence, one Excel file. - Empty Project allows creating a project with an empty Excel file. Open the project and create tables as needed. |
| Examples | Provide several simple projects demonstrating how OpenL Tablets can be used in various business domains. |
| Tutorials | Represents projects designed to familiarize users with OpenL Tablets step-by-step, from simple features and concepts to more complex ones. |
Projects represented as Examples and Tutorials can be used not only to learn how they are organized and work, but also to create user’s own projects from them.
To create a new project from template, proceed as follows:
-
In the top line menu, click Create Project.
The Create Project from window appears.
-
Clicks the Template tab.
Note: This tab is normally selected by default.
All project templates are organized into three areas: Simple Templates, Examples and Tutorials described above in this topic.
-
Navigate to the required template and click its name.
The name appears in the Project Name field. The following example demonstrates creating a project based on the example.
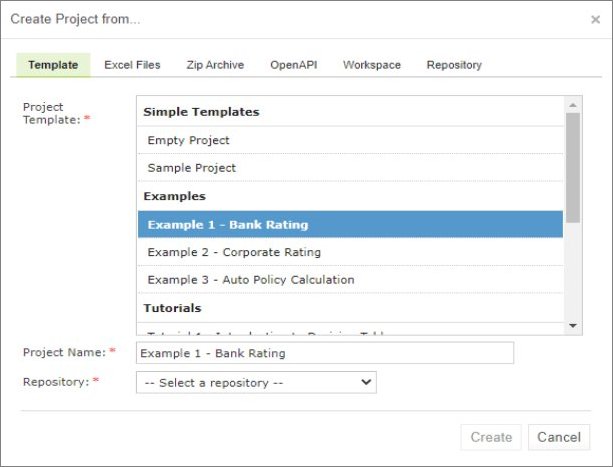
Creating a simple project from a template
-
Select a repository.
If there is only one repository, it is selected by default. Otherwise, a list of repositories is displayed. If a Git repository with non-flat structure is selected, the Path field with the / default value is displayed and can be modified as required. The path is defined inside the repository and can start with or without /.
-
Click Create.
If tag types are defined as described in the Managing Tags section, a tag pop-up window appears. For more details, see the Specifying tags for a new project section.
A new project is created in Design repository. Initially, project structure corresponds to the selected project template but can be constructed manually.
-
To construct the project structure, add folders and upload files as described in Modifying Project Contents.
Creating a Project Using a Custom Template
A custom project template can be created and then used during new projects definition. To create a new custom project template, proceed as follows:
-
If the OpenL Studio home directory
\<OPENL_HOME>,create the following directory:\<OPENL_HOME>\project-templates -
Create a subfolder with a template category name.
An example is
\<OPENL_HOME>\project-templates\My Custom Templates. -
For project templates that store files with project rules, create subfolders.
For example,
\<OPENL_HOME>\project-templates\My Custom Templates\MyRule1\rating.xlsxwill be presented as the MyRule1 template project in theMy Custom Templatescategory containing therating.xlsxfile.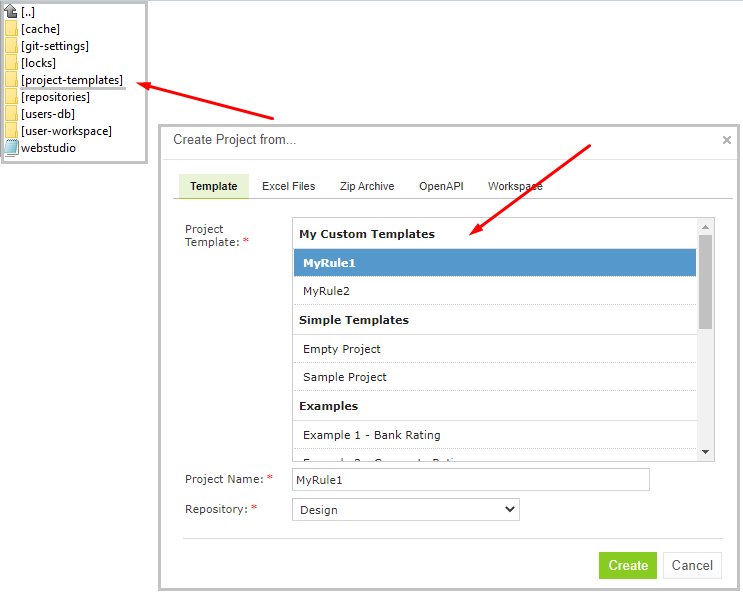
Creating a custom project template
Creating a Project from Excel Files
A rule project in the Design repository can be created by loading one or more Excel files that contain OpenL rule tables or entire rule projects.
Proceed as follows:
- Click Create Project in the top line menu.
- In the Create Project from dialog, click the Excel Files tab.
- Click the Add button, locate the necessary Excel file in a file system and click Open.
-
If required, repeat the previous step to add more files for the project.
All files are listed in the File area.
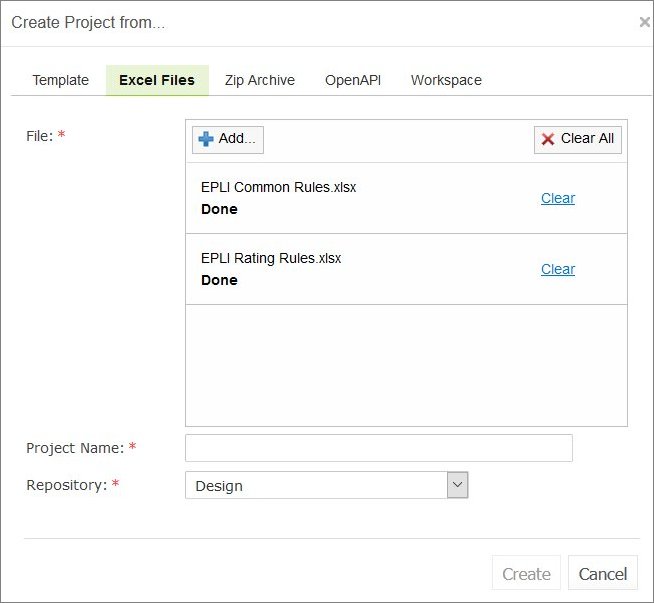
Creating a project from Excel files
A file can be removed from the list by clicking the corresponding Clear link. To delete all files, click Clear All.
- In the Project Name field, enter the name by which the project must be represented in Design repository.
-
Select a repository.
For more information on available repositories, see Creating a Project from Template.
- Click Create to complete.
If tag types are defined as described in the Managing Tags section, a tag pop-up window appears. For more details, see the Specifying tags for a new project section.
Creating a Project from OpenAPI file
A rule project in the Design repository can be created by uploading the OpenAPI file.
The OpenAPI Specification (OAS) defines a standard, language-agnostic interface to RESTful APIs which allows both humans and computers to discover and understand the capabilities of the service without access to source code, documentation, or through network traffic inspection.
The algorithm for generating a project from an OpenAPI file is described in the Appendix B: OpenAPI Project Generation Algorithm.
The OpenAPI file must have a valid structure and a JSON, YAML(YML) extension.
To create a project from the OpenAPI file, proceed as follows:
- Click Create Project in the top line menu.
- In the Create Project from window, click the OpenAPI tab.
- Click Add, select the required OpenAPI file in a file system, and double click it or click Open.
-
To remove an uploaded file, click Clear.
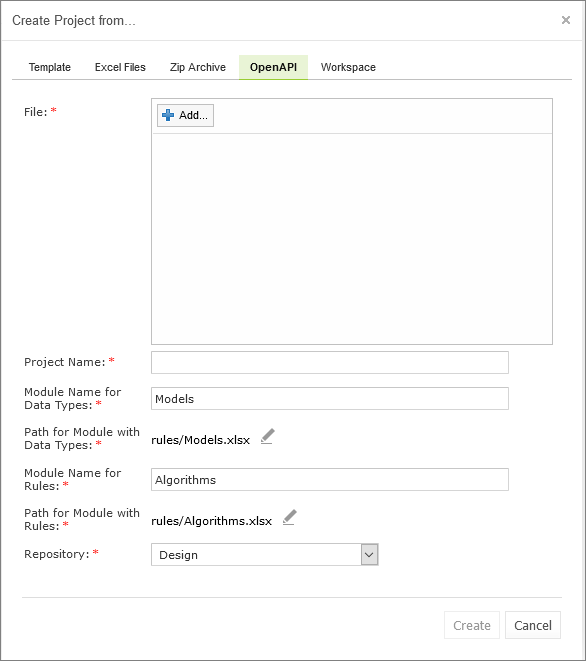
Creating a project from an OpenAPI file
- In the Project Name field, enter the name by which the project must be presented in the Design repository.
- If necessary, modify the file location and generated modules name.
-
Select a repository.
For more information on available repositories, see Creating a Project from Template.
- Click Create.
If tag types are defined as described in the Managing Tags section, a tag pop-up window appears. For more details, see the Specifying tags for a new project section.
Creating a Project from ZIP Archive
OpenL Studio provides a control for loading rule projects archived in a ZIP file into Design repository. The procedure resembles creating a project from Excel files described above although there are a few differences.
A project can only be created from a zip archive. The .rar or .7zip archives cannot be used.
- Click Create Project in the top line menu.
- In the Create Project from dialog, click the Zip Archive tab.
-
Click the Add button, locate the necessary zip archive and click Open.
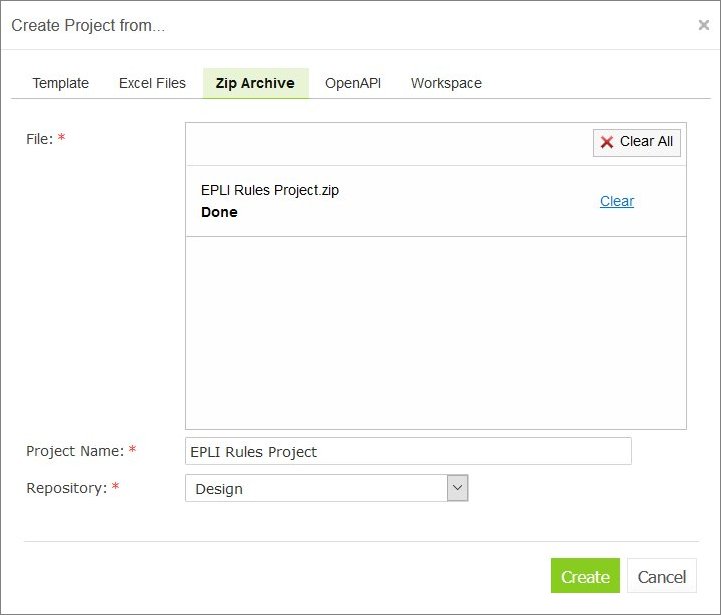
Creating a project from ZIP file
Project Name text box is automatically populated with the project name defined in
rules.xml,if the uploaded ZIP file containsrules.xml,or with the file name. -
If necessary, modify the project name.
It will be updated in
rules.xmlaccordingly. -
Select a repository.
For more information on available repositories, see Creating a Project from Template.
- Click Create to complete.
If tag types are defined as described in the Managing Tags section, or if the project already contains tags, a tag pop-up window appears. For more details, see the Specifying tags for a new project section.
Importing a Project from Workspace
A new project can be created in Design repository by loading a project with the Local status from user workspace.
- Click Create Project in the top line menu.
-
In the Create Project from dialog, click the Workspace tab.
The system displays rule projects available in the workspace:
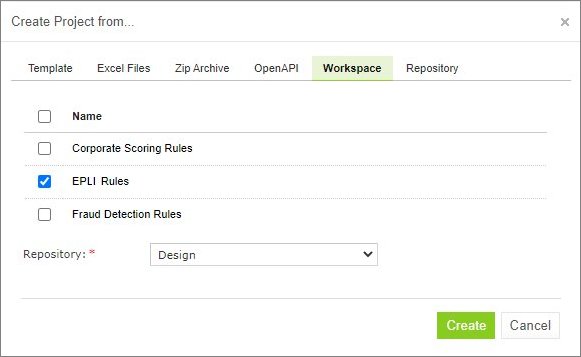
Creating a project from Workspace
- Select check boxes for projects to be uploaded.
- To complete creation, click Create.
If tag types are defined as described in the Managing Tags section, or if the project already contains tags, a tag pop-up window appears. For more details, see the Specifying tags for a new project section.
Creating a Project from a Repository
A project existing in the Git repository can be imported into OpenL Studio as follows:
- Click Create Project in the top line menu.
- In the Create Project from dialog, click the Repository tab.
- Select a repository and path and click Import.
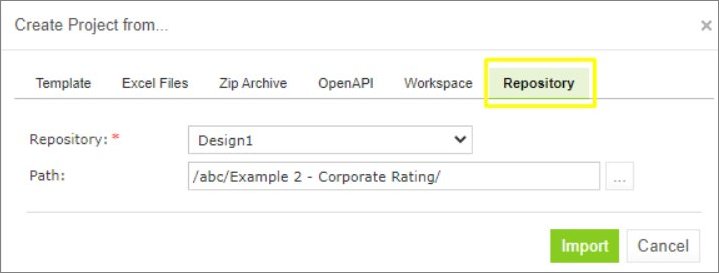
Importing a project from a Git repository
If tag types are defined as described in the Managing Tags section, or if the project already contains tags, a tag pop-up window appears. For more details, see the Specifying tags for a new project section.
Specifying tags for a new project
Project tags are stored in the tags.properties file located in the root directory of the project.
A new project may already contain tag values. This can happen, for instance, when a ZIP file is imported or an existing project is copied. In such cases, a project might include tags that are not configured or incorrectly configured in OpenL Studio. This occurs when the corresponding tag type is not configured at all, or if the tag type is not extensible and the specified tag value is not allowed.
If the project contains tags that cannot be applied, a Missing tags pop-up window is displayed. This window lists the tag values, explains why they cannot be applied, and indicates what will happen next. If a tag type is not configured in OpenL Studio, the corresponding tag will be ignored. If a tag value is not permitted, a follow-up dialog prompts the user to enter a valid value.
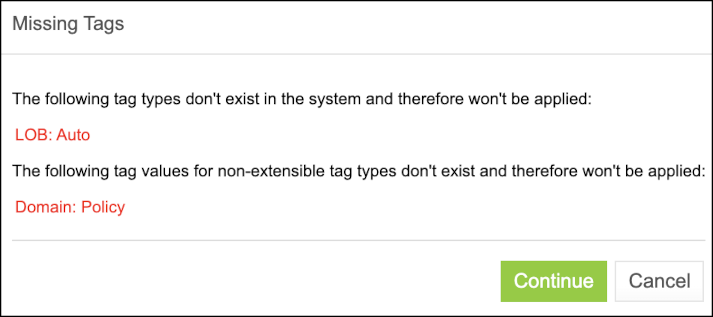
Some tags are not configured properly
If the tag types are defined as described in the Managing Tags section, a pop-up window appears, prompting the user to specify project tags.
Default tag values are determined in the following order:
- If the project already contains a tag value, it is used as the default.
- If a tag value can be derived from the project name templates, it is applied.
- Otherwise, None is set as the default.
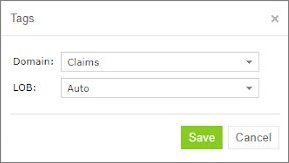
Selecting project tags
If a tag type is defined as optional, the project can remain with the tag value None. If the tag type is defined as extensible, new tags can be created in the pop-up window by clicking on the required tag field and entering a new value. Otherwise, only predefined tag values can be used.
Opening a Project
An opened project is copied to user’s workspace and becomes available for selection in Rules Editor. The project is opened for viewing and can be modified if it is not locked by another user. When a user modifies a project, its status is set to In Editing and it becomes locked for other users who now can only view it.
To open a project, in the project tree, select the project and, in the right pane, click one of the following buttons as required:
| Button | Description |
|---|---|
| Open | Opens the latest revision of project. |
| Open Revision | Displays window where user can specify which project revision must be opened. |
Any project revision can be opened, with the project status set to Viewing Revision, as follows:
- Opening a Project Revision Using the Open Revision Button
- Opening a Project Revision Using the Revisions Tab
Opening a Project Revision Using the Open Revision Button
To open a project revision using the Open Revision button, proceed as follows:
- Click the Open Revision button.
-
In the Project Revisions field, select the required revision.

Opening a project revision using the Open Revision button
- Click Open.
Opening a Project Revision Using the Revisions Tab
To open a project revision using the Revisions tab, proceed as follows:
- In the Projects tree, select a project.
-
Click the Revisions tab.
A list of revisions appears.
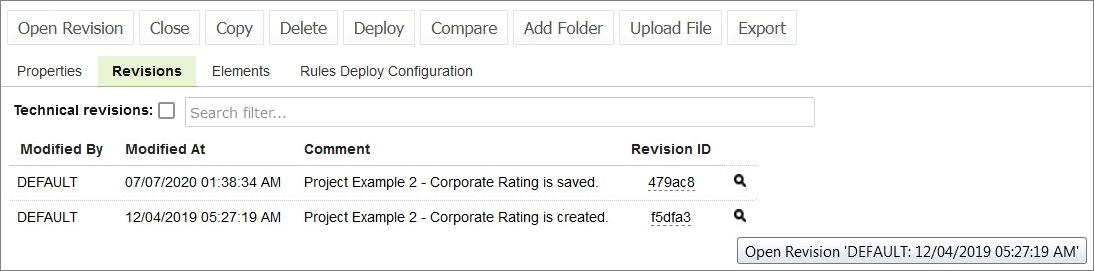
List of project revisions
- Navigate to the revision that needs to be opened and click the corresponding magnifier icon in the Action column.
- In the information message, click OK.
If a project has the Viewing Revision status, the opened project revision becomes available for viewing and modifying, not the latest revision.
If user tries to modify an old revision of the project, the system displays the warning message, “You are trying to edit old revision of the project. Do you want to overwrite newer revision?” When user modifies the old revision, it becomes the current version of the project, and its status changes to In Editing.
Revisions can also be accessed through Editor by selecting More > Revisions for a project.
The features Technical Revision and Search Filter are available in OpenL Studio when the repository type is Git.
The Technical Revisions feature, when checked, allows users to see revisions that are not directly related to the current project (for example, changes related to code updates or changes in other projects).
The Search Filter field helps users quickly locate specific revisions by searching through the comments, modified by, and revision IDs.
Closing a Project
Closing a project deletes it from the user’s workspace. No changes made to the project will be applied and stored. From that point, the project is not available for selection in Rules Editor. Users can still browse closed projects in repository editor.
To close a project, in the project tree, select the project and, in the right pane, click Close.
Saving a Project
A modified project is saved and copied from the user’s workspace to Design repository as a new revision.
To save a project, proceed as follows:
-
In the project tree, select the project, and, in the right pane, click Save.
The Save changes window appears:
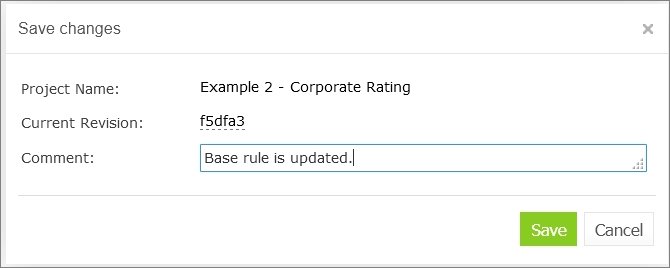
Save changes in a project
The number of a revision is updated automatically and is specified in the Next Revision field.
-
Enter comments if needed and click Save.
An editable project can be saved and closed directly from Rules Editor as described in Editing and Saving a Project.
Viewing Project Properties
Each rule project has a set of properties displayed in the Properties tab when a project is selected.
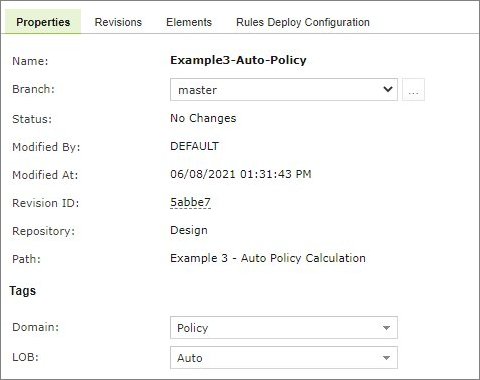
Project properties
Properties, such as Name and Created At / Created By, are updated automatically by the system, and users cannot edit them in the OpenL Studio UI. However, a user can modify tags in this tab.
If the user chooses to modify tag values, the project status will change to In Editing, unless it is already in this state.
There are scenarios where a project has a tag that does not have a configured tag type, as described in the Managing Tags section, or contains a value that is not permitted. This can occur if a project was created before tag types were reconfigured or removed.
In cases where a tag type is missing, the user can only change its value to None, effectively removing the tag.
If a tag contains a value that is not permitted, the user can only update it to a permitted value.
If a tag is used for grouping in a project tree, its value in a tree gets updated only when the project is saved.
Note that in case of the Git repository, in the Modified By field, the user’s display name is used, not the username, and the tooltip for this field displays the user’s email.
Modifying Project Contents
This section describes modifying the physical structure of the project and includes the following topics:
Creating a Folder
To create a new folder in the project structure, proceed as follows:
-
In the project tree, select the parent folder in which the new folder must be created.
To create a root level folder, the project name must be selected in the project tree.
- In the right pane, click Add Folder.
- In the Add Folder window, enter the folder name and click Add.
Uploading a File
To upload a file to a project folder, proceed as follows:
-
In the project tree, select the folder where the file should be uploaded.
To upload a file to the root level, the project name must be selected in the project tree.
-
In the right pane, click Upload File.
The Upload File window appears:
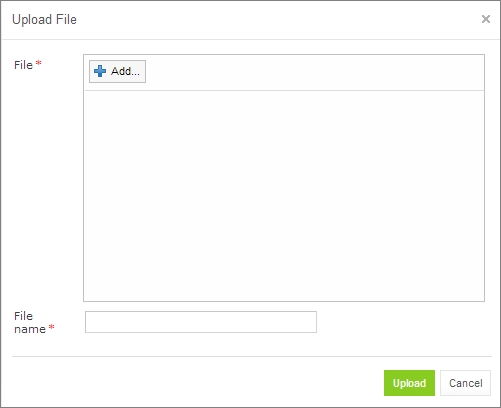
Uploading a file
- Click Add in the File area and select the file to be uploaded.
- Click the upper Upload button (with a green arrow).
- In the File name field, enter or modify the name of the file to be used in Design repository.
- Click the Upload button at the bottom.
Updating a File
To update a file of a project via repository editor, proceed as follows:
- In the project tree, select the file to be updated and, in the right pane, click Update file.
- In the window that displays, click Add and choose the required file for updating.
- Click the Upload button to load the file.
- Click Update to end the action.
Deleting a Folder or a File
To delete a folder or a file in the project structure, proceed as follows:
- Perform one of the following steps as required:
- Expand the project tree, select the folder or file to be deleted and, in the right pane, click Delete.

Deleting a project element
- To delete an element inside the parent folder, select that folder, click Elements to expand the folder and then click Delete
 at the right of the item to be deleted.
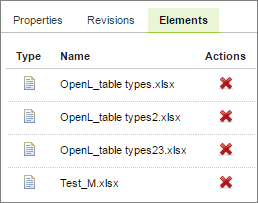
Deleting project elements from the Elements tab
- In the confirmation window, click OK.
Copying a File
A user can create a copy of a file using the repository editor. The current revision of the file or any revision stored in the repository can be used for copying. Proceed as follows:
- Select a project that contains a file to copy and in the files tree, select the required file.
- In the upper left corner of the page, click Copy file
 .
. - In the window that appears, select the Current Revision or clear it and in the File Revision field, select a value.
- Optionally, enter the New File Path property value.
-
In the New File Name field, enter the file name.

Copying a file in repository editor
- Click Copy.
The newly created file appears in the file tree.
Copying a Project
Copying a project creates a new project with identical contents and a different name in Design repository. This function can be used for copying local projects to Design repository with a different name.
To copy a project, proceed as follows:
- Perform one of the following steps as required:
- In the Projects tree, select the required project and, in the right pane, click the Copy button.
- Click Projects in Navigator to get a list of projects, navigate to the project you want to copy and click the corresponding Copy item
 on the right.
- In the Copy Project window, enter the new project name.
-
Select whether a new project must be linked to the origin project.
In case of linked projects, a new project branch is created. For more information on branches, see Working with Project Branches. For unlinked projects, if there are mandatory tag types, tags must be defined for a new project.
- Specify whether old revisions must be copied to the newly created project.
-
If necessary, select a repository and specify the path to the destination project.
A project can be copied to another repository with the same or a new name.
- Optionally, provide comments.
- Click Copy.
The new project appears in the list of projects.
Removing a Project
Removing a project is executed in the following phases:
Deleting a Project
A deleted project is removed from user’s workspace and marked as deleted in Design repository. All users can see that a project is deleted. Physically, it still remains in Design repository.
Note: Projects in the Local status that were not uploaded to Design repository will be removed physically and cannot be restored.
To delete a project, proceed as follows:
- Perform one of the following steps as required:
- In the Projects tree, select the project and, in the right pane, click Delete.
- Click Projects in Navigator to get a list of projects, navigate to the project you want to remove and click the corresponding Delete item on the right.
-
In the confirmation window, click Delete or OK.
Deleted projects, except for those in the Local status, can be restored by using the Undelete button.
To make deleted projects visible, uncheck the Hide deleted projects checkbox in the filter pop-up window, which appears after clicking the Filter button above the Projects tree, and click Apply.
To restore a deleted project, proceed as follows:
- Navigate to the deleted project in the Projects tree.
- Click the Undelete button in the right pane.
- Click Undelete in the confirmation window.
Erasing a Project
Erasing a project permanently removes it from Design repository.
Warning: Erased projects cannot be restored.
To erase a project, proceed as follows:
- Delete the project as described in Deleting a Project.
- Ensure that the Hide deleted projects option is cleared.
- In the Projects tree, select the project and, in the right pane, click Erase.
-
If the project is erased from the non-flat Git repository, to delete a project from the repository project tree but keep it in the Git repository, ensure that the Also erase it from repository check box is cleared.
In this case, it can later be imported into the repository as described in Creating a Project from a Repository.
If this check box is selected, the project is erased from both repository project tree and Git repository and becomes no longer available for import.
- In the confirmation window, click Erase.
Deploying a Project
OpenL Studio allows deploying a project directly to a deployment repository.
To deploy a project, proceed as follows:
- In the Projects tree, select the project to deploy.
-
In the top menu, click Deploy.
Note: The Deploy button is disabled if the selected project has the Local status or is currently being edited.
The Deploy “<Project Name>” project dialog appears.
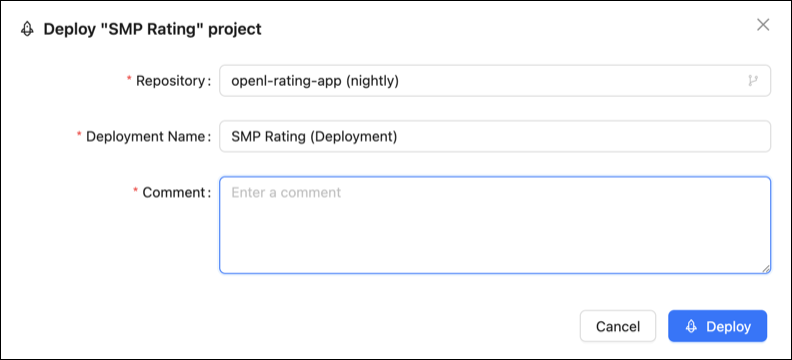
Deploy project dialog
- In the Repository dropdown, select the target deployment repository.
- In the Deployment Name field, select an existing deployment from the list or type a new name to create one.
- In the Comment field, enter a comment describing the deployment.
- Click Deploy.
The project is deployed to the selected deployment repository.
The following topics are included in this section:
Configuring Rules Deploy Configuration Settings
Deployment rules can be added before deploying a project to deployment repository. If a project already has the rules-deploy.xml configuration file, it can be edited via the Rules Deploy Configuration menu.
Proceed as follows:
- In the top line menu, click Rules Deploy Configuration.
- Click Create rules deploy configuration.
- In the window that appears, enter the following information about the rules:
- Provide runtime context.
- Use the Rule Service runtime context.
- Define variations.
- Create services specifying the versions of web services to support, which is either the RESTful service, or RMI, or both of them.
-
Enter the service name.
The service name is displayed for a deployed project only in the embedded mode.
- Define the service class.
- Define an RMI service class.
-
Define the service version.
For more information on service version definition, see Defining Rule Service Version.
- Enter URL of the service.
-
In the Template class field, define Annotation template class.
Note: In OpenL Tablets versions prior to 5.24.1, separate fields for Intercepting template class and Annotation template class are supported. Since Annotation template class completely covers Intercepting template class and have a higher priority, from 5.24.1, only Annotation template class is displayed in the Template class field. If the existing configuration have both Annotation template class and Intercepting template class, only Annotation template class is displayed on UI and saved in the file after editing.
Exception: For projects with OpenL version compatibility and version prior to 5.16, only the Intercepting template class: field is displayed instead of Template class.
- Define comma separated service groups.
-
Add configuration description to the XML file.
For more information on the Rules Deploy Configuration tab settings configuration, see OpenL Tablets Rule Services Usage and Customization Guide > Service Configurer.
-
Click Save Configuration.
The selected rules are displayed in the Rules Deploy Configuration tab.
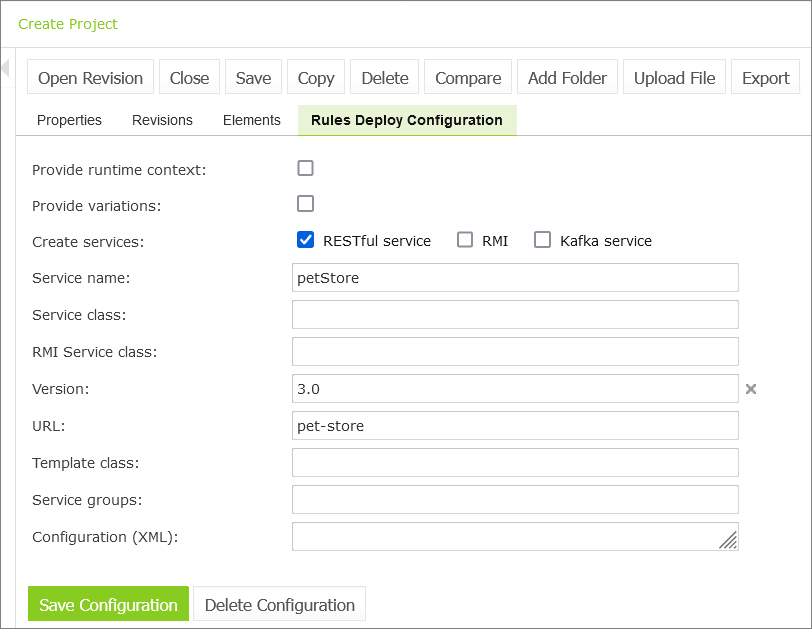
Defining rules deploy configuration settings
Defining Rule Service Version
OpenL Studio supports versioning definition for rule services. This functionality allows specifying a version for the project revision to be deployed. The required version of the deployed project can be called from deployment repository. All specified versions of the project appear on the OpenL Tablets Rule Services page with a version number defined in brackets.
To check the services version deployment, in OpenL Tablets Rule Services, find the name of the deployed project. Services version is set both in the services header and in the services URL.
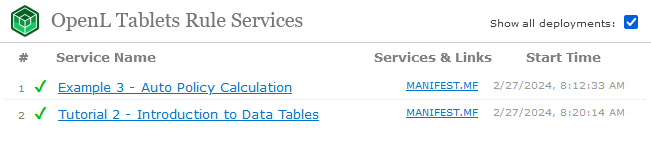
Services header and URL with the version number
To define the rule service version, proceed as follows:
- In the Projects tree, select a project.
- In the top line menu, click Rules Deploy Configuration.
-
In the window that appears, click the Version field.
By default, the Major 0, Minor 0 scroll list appears.
- For more information on how to configure deployment configuration settings, see Configuring Rules Deploy Configuration Settings.
-
In the scroll list, select the services version.
For example, to create the services version 1.0, Major = 1 and Minor = 0 must be selected.
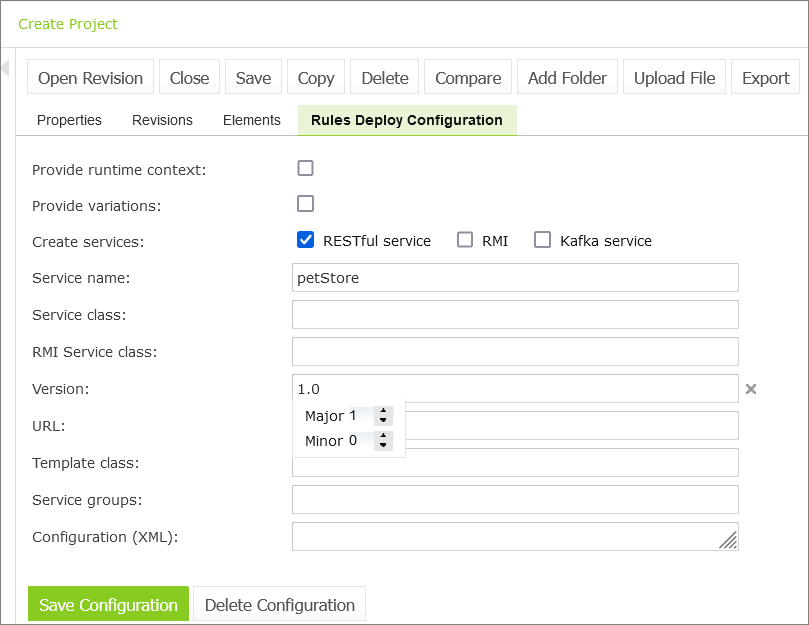
Defining services versioning
- Click Save Configuration.
The selected services version is displayed in Rules Deploy Configuration for the selected project. For the example displayed in this section, the project version is 1.0.
Comparing Project Revisions
OpenL Studio provides a function for comparing files and sheets in Excel files between two project revisions. To compare contents of the currently opened project revision with any other revision, proceed as follows:
- In the project tree, select the project.
-
In the right pane, click Compare.
A window appears listing contents of the currently opened project version on the left side and contents of another project revision on the right side.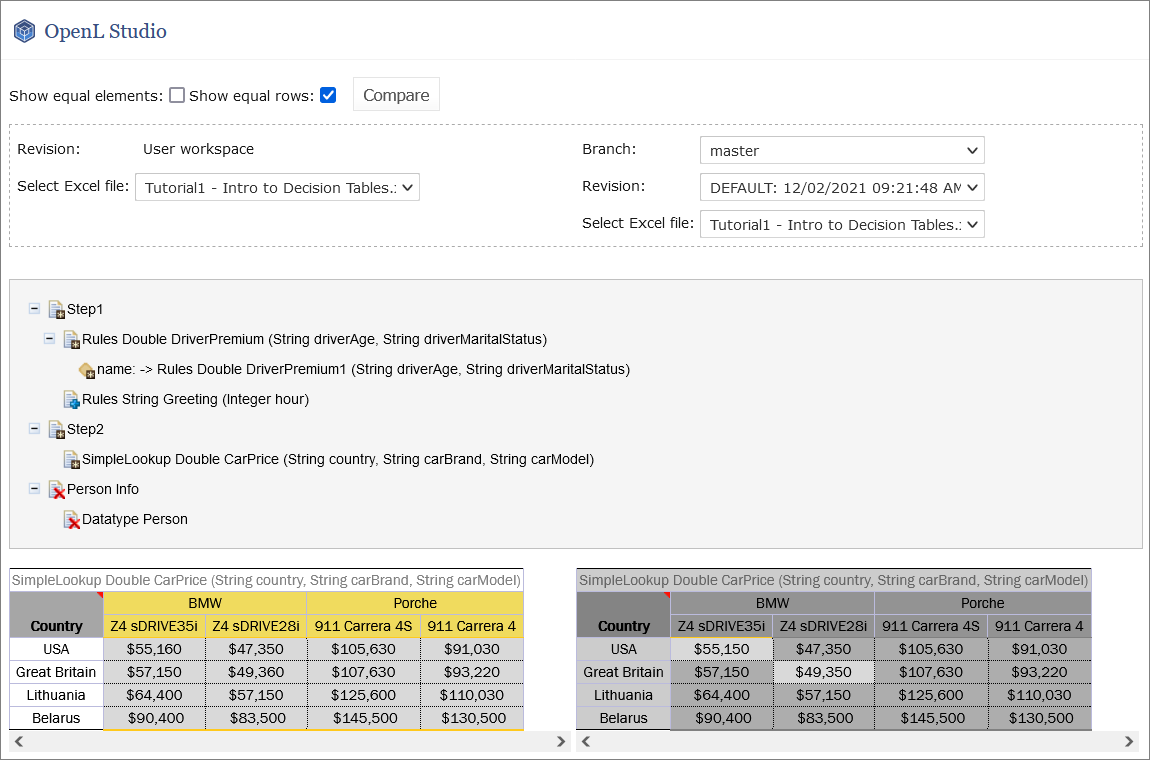
Comparing the current project revision from user workspace to the second project revision
- To view or hide equal rows in the table, select or clear the Show equal rows check box.
- To compare the current project revision with a different revision, select the branch and revision.
Exporting a Project or a File
To export a project from repository editor, proceed as follows:
- In the project tree, select the project.
- In the right pane, click Export.
- In the displayed window, select the required project revision, click Export and a full project in the selected revision will be exported.
The default project version for export is the one that a user has currently open in Rules Editor. If it contains unsaved changes, it is marked as In Editing, otherwise, it is called Viewing.
To export any revision of a file from Repository, proceed as follows:
- In the project tree, select the project.
- Expand the project tree and select the file to be exported.
- In the right pane, click Export file.
- In the displayed window, select the required file revision and click Export.
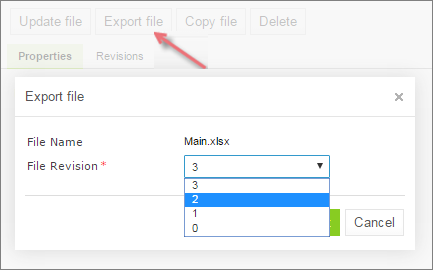
Exporting a file from a project
Note: If the project is in the Local status, these options are not available.
Unlocking a Project
OpenL Studio provides a function for a user to unlock a project which is edited and, therefore, locked by another user. Be aware that after unlocking, all unsaved changes made by another user will be lost and the project will be closed. The name of the user who locked the project appears in project summary, next to the project status.
To unlock a project, proceed as follows:
- Perform one of the following steps as required:
- In the Projects tree, select the project and, in the right pane, click Unlock.
- Click Projects in Navigator to get a list of projects, navigate to the project that needs to be removed and click the corresponding Unlock item
 on the right.
- In the confirmation window, click OK.
It is recommended to grant permission to the “Unlock” functionality only for administrators.
Browsing the Deployment Repository
The Deployment repository contains project deployments and is also the location from where solution applications use them. OpenL Studio allows connecting several deployment repositories. For information on how to configure deployment repositories, refer to Managing Repository Settings.
To browse a deployment repository, proceed as follows:
- Switch from the Design repository view to the Deployment repositories view by clicking Deployment in the top of the left pane.
-
In the project tree, select the deployment repository to be browsed (repositories are marked by
 icon).
The list of project deployments in the selected deployment repository are displayed in the middle pane.
- If needed, expand the repository tree and browse project deployments.
OpenL Studio displays only the latest revisions of each deployment in the deployment repository.
When browsing deployments in the deployment repository, users can see their content, namely what rules projects are deployed.
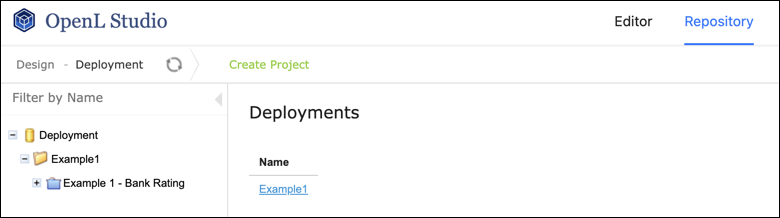
Deployment repository with deployed projects
Committing with Missing User Data
Upon user logon, the user’s display name and email are used for Git commits if the repository type for the action is Git. This applies to the following actions:
- create a project
- save a project
- delete a project
- undelete a project
- erase a project
- deploy a project
- synchronize a project
If the display name and email data is missing, the Configure commit info popup window appears on commit attempt. Once all the required information is entered and saved, the action that triggered the commit is completed automatically.